Updated to work with 2.6.+ -- H1~T3k_HillBilly
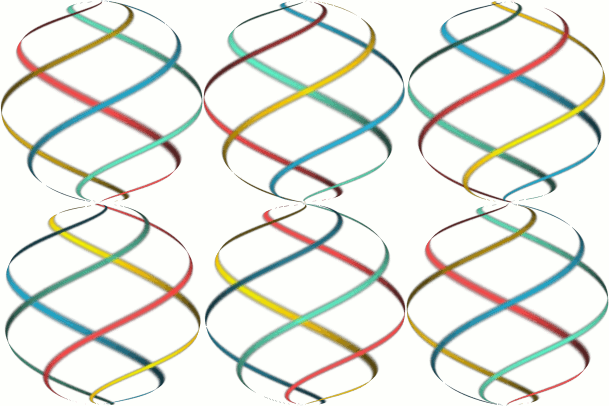
In this tutorial, I will show you how to easily create this animation:
You won't need anything special to complete the tutorial - not even GAP! I created my original one using GAP, but then the light went on and I realized there's a built-in script that will do what we want very nicely. Plus, this way makes it Mac friendly, as GAP is not available to Mac users. I've also prepared this so that even newb's to GIMP can do this successfully. All you seasoned GIMPers will be able to bypass many of the initial steps.
I do, however, I suggest that you download this script for those using the current stable versions of GIMP :
Animation Settings by saulgoode, as it will prove useful to you for this and other animation effects. For those of you using the new beta versions of GIMP (v. 2.4xx), please check out this updated script:
Updated Animation Settings for GIMP 2.4 (thanks Kreuger for letting me know about this problem and tracking down the updated version!) Since I'm using the current stable version of GIMP, I don't know if the updated script will work in the stable version. So, you can try the updated version if you're using the most current version, but if you run into any trouble, I suggest you delete it and download the script from the first link.
The script is nothing more than a text file. If you're using firefox, go to File Menu > Save Page As and then add a '.scm' extension to the end of the file name and save it to your GIMP/Scripts folder. If you're using Internet Explorer, go to File Menu > Save As and make sure under the "Save As Type" box, you choose Text File. Then add a '.scm' extension to the end of the file and save it to your GIMP/Scripts folder.
Next, start GIMP or, if GIMP was already open, go to the main GIMP window Xtns Menu > Script-FU> Refresh Scripts and, if you followed the instructions above, the script will be found here:
Filters Menu > Animation > Settings...
Let's begin:
Step 1Create a new document (Ctrl+N) 500X500 pixels in size with a transparent background:
Step 2Now, we need some Grids to help us line up our colors. To do this, go to the View Menu and turn on the Show Grid & Snap to Grid options as shown below:
Next, let's modify the Grid settings to space them apart. Go to Image Menu > Config Grid...
in the dialog window that opens, change your settings like so:
Your results will look like this:
 Step 3
Now, grab a brush (you can use any size - hard or soft....I believe I used a Default GIMP 15X15 Fuzzy brush), select the desired color, and place your cursor in one of the coordinate locations shown below in red (Because we've turned on snap to grid, the middle of the brush will snap to that location), click once with the brush,
and while holding down the shift key to create a straight line, click at the coordinate location opposite from the first click. For example, if you start at (0,0) your next brush click should be at (500, 500). Now, pick another color and do the same.
IMO, a hard-edged brush works better, but you try it out for yourself. Notice the arrangement of my colors....for your colors to line up correctly on the sphere, you must have them in this order.
 Step 4
Now, we need to shrink our image size down to the final size.
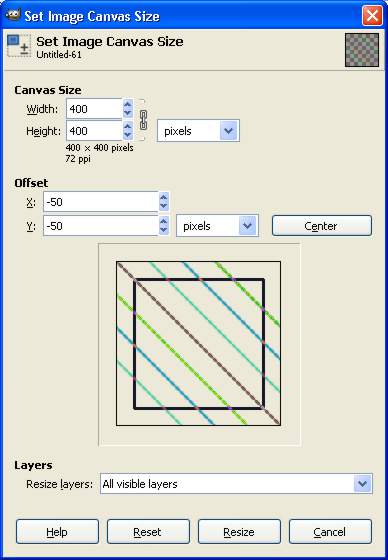
Go to Image Menu > Canvas Size...
and change the settings like so:

and here's the result:
The reason I had you create a larger size canvas is that if you started with a 400X400 image, the ends of the colored lines (ie at coordinates (0,0) and (500, 500) wouldn't be perfectly "square". When we go to the next step to convert it to a sphere, the ends wouldn't seamlessly matchup and would appear jagged....we don't want that!Step 5Next, go to Filters > Animation > Spinning Globe
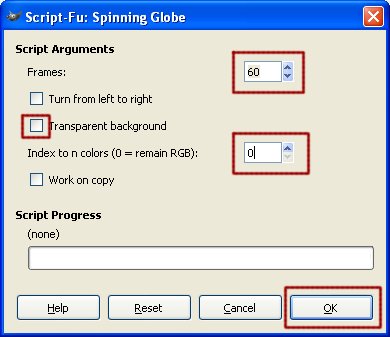
and change the following settings:

- You'll note that I used 60 for the frames. This will give us a final result that has 60 frames in it, which is certainly much smoother, but will also take much longer to create and will result in a much larger file size. You choose whatever you feel comfortable with.
- Also, I deselected the transparent background option. If you want, you can check this option and your background will be transparent, but it might have jagged edges depending on the background you place it on. If you leave this unchecked, the animation will have a background color that matches the current background color in GIMP. My background color was white when I ran the script; therefore, the animation came out with a white background.
- Lastly, I suggest you set the "Index to n colors" to 0. This means the script will create the layers in RGB mode. Later, when you save it to a gif, your layers will be converted to index mode, but I've found the results to be much better by leaving this value set to 0.
Hit OK and let the script work its magic!
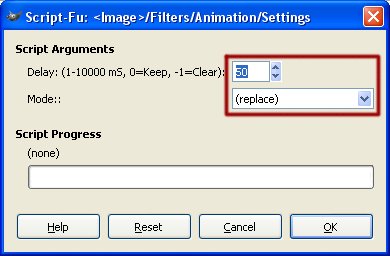
Step 6Now, let's use the script I had you download to make some changes to all the layers that we created. Go to Filters Menu > Animation > Settings...
and change the settings as shown:

I used a Delay of 50, but you set the number as you see fit. The higher the number, the longer delay time between each frame. Also, make sure you choose "Replace" for the Mode setting. This will replace the current frame with the next one in the stack.
Click OK and let the script run (should only be a few seconds).
Step 7Now, go to File Menu and choose Save or Save As....and give it a name with a
.gif extension.
The following dialog windows will appear. Make the selections as shown:
If you've done everything correctly, your animation should resemble this:

Simple, yet mesmerizing!
Enjoy!
Art